ฉันจะสร้างแผ่นงานเชิงโต้ตอบได้อย่างไร
การสร้างแผ่นงานเป็นเรื่องง่ายและสนุกในไม่กี่ขั้นตอน ขอให้สนุกและสำรวจความคิดสร้างสรรค์!
- หากต้องการสร้างเวิร์กชีท คุณต้องเข้าสู่ระบบในฐานะครู และคลิกที่ เวิร์กชีท
- ถัดไป เปิดหน้าแผ่นงานของฉัน และคลิก เพิ่มแผ่นงาน
- การสร้างแผ่นงานมีหลายขั้นตอนง่ายๆ
- ขั้นแรก คุณต้องเพิ่มกราฟิกหลักของคุณสำหรับแผ่นงานของคุณ กราฟิกนี้สามารถเป็นรูปแบบไฟล์ต่อไปนี้: PNG, JPG, JPEG และ PDF ไฟล์ทั้งหมดต้องมีขนาดไฟล์ไม่เกิน 5.5 MB คลิกปุ่ม เพิ่มสื่อ และ เลือกไฟล์ เพื่อค้นหาไฟล์บนคอมพิวเตอร์ของคุณ คุณจะเห็นภาพของคุณถูกอัปโหลดแล้ว จากนั้นคลิก บันทึก
- เมื่อคุณดำเนินการเสร็จแล้ว ไฟล์นี้จะเพิ่มไฟล์นี้ลงในไลบรารีสื่อของคุณ เพื่อให้สามารถนำมาใช้อีกครั้งเพื่อสร้างแผ่นงานอื่นได้ หากคุณได้เพิ่มไฟล์ของคุณลงในไลบรารีสื่อแล้ว ให้เลือกไฟล์โดยคลิกที่รูปภาพซึ่งจะเปิดใช้งานช่องทำเครื่องหมายสีส้ม จากนั้นคลิก แทรกที่เลือก
- ถัดไปกรอกข้อมูลที่จำเป็นในการสร้างแผ่นงานของคุณ โดยเริ่มด้วยการให้ชื่อในแผ่นงานของคุณ
- ป้อนคำอธิบายเนื้อหาของแผ่นงาน การใช้พื้นที่นี้เพื่ออธิบายสิ่งที่นักเรียนกำลังทำกับใบงานจะเป็นประโยชน์
- ป้อนภาษาของนักเรียน
- ป้อน หัวเรื่อง
- ป้อนเนื้อหาหลัก
- ป้อนเนื้อหาอื่นๆ
- เลือกระดับ
- เลือก ใช่ หรือ ไม่ สำหรับการดาวน์โหลด PDF หากคุณเลือกใช่ ผู้ใช้จะสามารถดาวน์โหลดแผ่นงานของคุณได้
- เลือก จากอายุ เพื่อป้อนช่วงอายุเริ่มต้นสำหรับนักเรียนของคุณและ อายุถึง
- เลือกว่าจะอนุญาตให้เอกสารของคุณเป็นแบบ ส่วนตัว หรือ สาธารณะ โปรดทราบว่าสำหรับบัญชีฟรี มีการจำกัดจำนวนแผ่นงานที่คุณได้รับอนุญาตให้สร้างแบบส่วนตัว
- ตอนนี้เราจำเป็นต้องสร้างแผ่นงาน ในการดำเนินการนี้ คุณต้องเพิ่ม องค์ประกอบ ลงในแผ่นงานของคุณ คุณสามารถทำได้โดยคลิกที่ องค์ประกอบ ในคอลัมน์ด้านซ้าย สำหรับคำแนะนำเกี่ยวกับวิธีการเพิ่มองค์ประกอบ โปรดดูด้านล่าง
- เมื่อคุณเลือกองค์ประกอบแล้ว องค์ประกอบนั้นจะปรากฏบนแผ่นงาน คุณสามารถลากไปยังตำแหน่งได้โดยคลิกที่มันแล้วย้ายไปยังตำแหน่งที่คุณต้องการวาง คุณสามารถปรับขนาดได้โดยการวางเมาส์ไว้เหนือขอบขององค์ประกอบ จากนั้นคลิกเพื่อขยายให้มีขนาดที่ต้องการ
- ถัดไป หากต้องการกำหนดค่าองค์ประกอบ คลิกที่ไอคอนดินสอสีเขียว ซึ่งจะเปิดการตั้งค่าสำหรับองค์ประกอบนั้น กรอกค่าแล้วคลิก บันทึก
- ทำสิ่งนี้กับองค์ประกอบที่เหลือทั้งหมดที่จำเป็นในเวิร์กชีท
- เมื่อเสร็จแล้ว คุณสามารถคลิก บันทึก หรือ บันทึกและดู แผ่นงาน เพื่อลองสร้างผลงานใหม่ของคุณ!
องค์ประกอบคืออะไรและใช้งานอย่างไร
หากต้องการสร้างเวิร์กชีทแบบโต้ตอบ คุณต้องใช้ Elements เพื่อปรับแต่งเวิร์กชีทของคุณและกำหนดวิธีการใช้งาน องค์ประกอบเชิงโต้ตอบแต่ละรายการ เช่น Drag & ไฟล์เสียงแบบดรอปหรือ PlayMP3 เรียกว่า Element หากต้องการสร้างองค์ประกอบ คลิก & ลากองค์ประกอบลงบนแผ่นงาน สร้างสรรค์!
นี่คือรายการองค์ประกอบทั้งหมด:
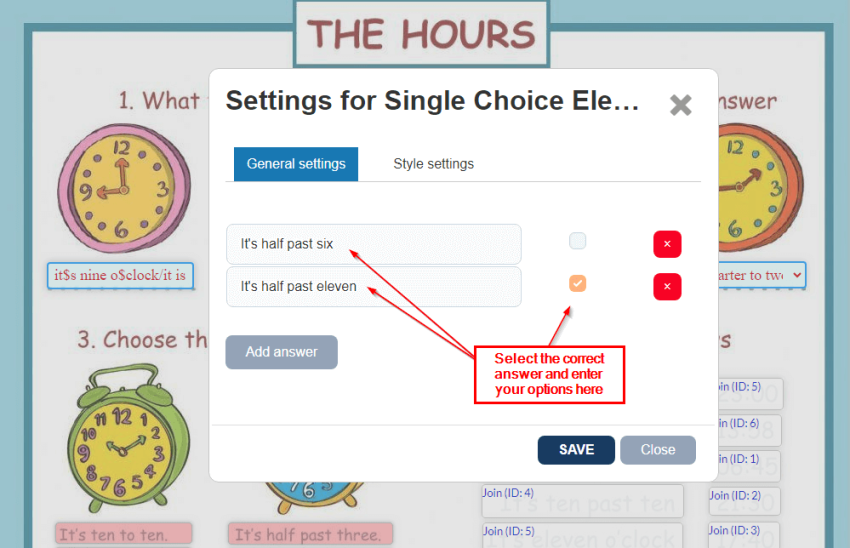
- ตัวเลือกเดียว สร้างรายการตัวเลือกให้นักเรียนเลือก คลิกช่องทำเครื่องหมายเพื่อระบุคำตอบที่ถูกต้อง ใช้องค์ประกอบนี้สำหรับคำถามแบบเลือกเดียว
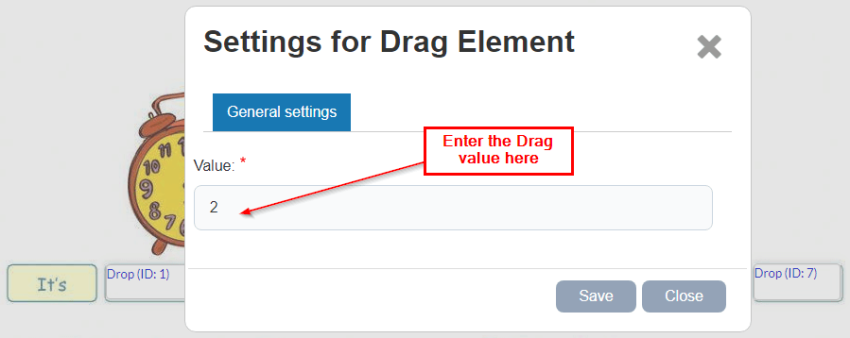
- ลาก (และวาง)< /span>
จับคู่องค์ประกอบ Drag นี้กับองค์ประกอบ Drop หากต้องการเชื่อมต่อ ให้ป้อนตัวเลขหรือค่าข้อความเดียวกันในทั้งสององค์ประกอบ ซึ่งจะสร้างกิจกรรมลากและวางเชิงโต้ตอบสำหรับนักเรียน
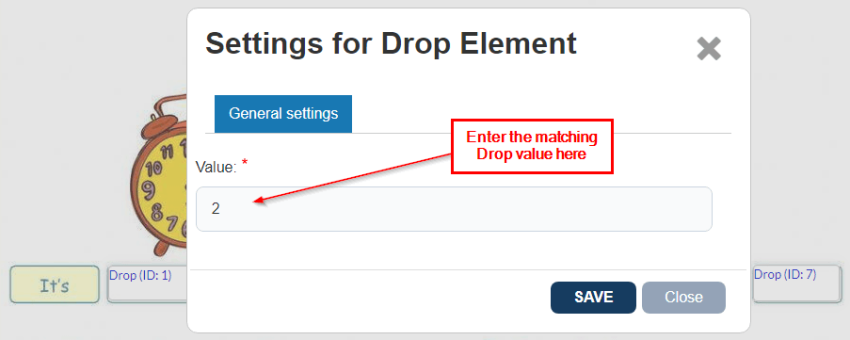
จับคู่องค์ประกอบ Drop นี้กับองค์ประกอบ Drag หากต้องการเชื่อมต่อ ให้ป้อนตัวเลขหรือค่าข้อความเดียวกันในทั้งสององค์ประกอบ ซึ่งจะสร้างกิจกรรมการลากและวางเชิงโต้ตอบสำหรับนักเรียน

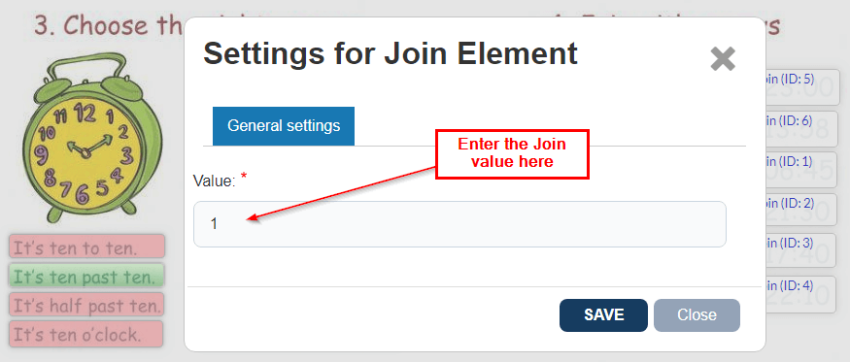
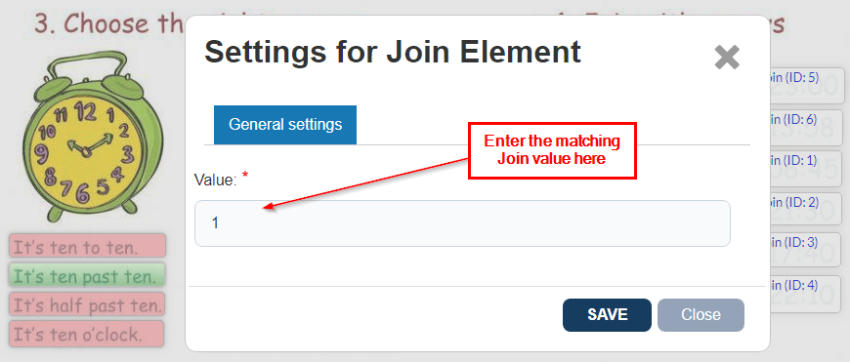
- Join (with arrows)
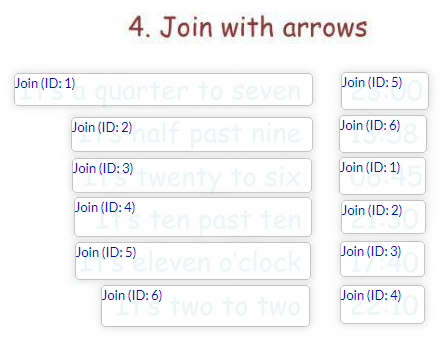
ใช้องค์ประกอบนี้เพื่อเชื่อมต่อส่วนประกอบต่างๆ ในรูปภาพด้วยสายตา สร้างองค์ประกอบ "เข้าร่วม" สององค์ประกอบโดยป้อนตัวเลขหรือค่าข้อความเดียวกันลงในทั้งสององค์ประกอบ เมื่อนักเรียนเชื่อมต่ออย่างถูกต้อง ระบบจะให้คะแนนตามนั้น ตรวจสอบให้แน่ใจว่ามีเพียงสององค์ประกอบเท่านั้นที่ใช้ค่าเดียวกัน
- Link
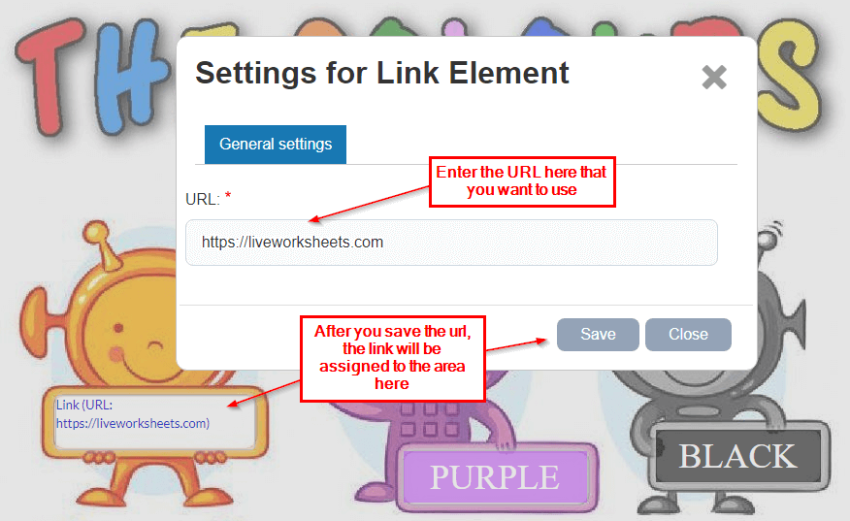
สร้างลิงก์ที่คลิกได้ เช่น ไปยังแบบฝึกหัดหรือข้อมูลอ้างอิงอื่น คลิกปุ่มแก้ไขเพื่อป้อน URL ปลายทาง นักเรียนจะถูกเปลี่ยนเส้นทางไปยังหน้าที่ระบุเมื่อคลิกลิงก์
- Listening สร้างแบบฝึกหัดการฟังด้วยข้อความที่พิมพ์ คลิกแก้ไขเพื่อป้อนข้อความพูดหรือเลือกภาษาของผู้พูด อาจไม่ทำงานในเบราว์เซอร์อื่นที่ไม่ใช่ Google Chrome และ Safari
- พาวเวอร์พอยต์ ฝังงานนำเสนอ Microsoft PowerPoint รับ URL การนำเสนอโดยใช้ตัวเลือก "แชร์และฝัง" ในแอปพลิเคชัน PowerPoint URL ต้องขึ้นต้นด้วย "https://onedrive.live.com/embed?... ." คลิกแก้ไขเพื่อป้อน URL
- เล่น MP3< /span> เพิ่มไฟล์ MP3 เพื่อดูคำแนะนำหรือเสียง คลิกแก้ไขเพื่ออัปโหลดไฟล์จากคอมพิวเตอร์ของคุณ
- ข้อความธรรมดา แสดงตัวอย่างข้อความสั้นแก่นักเรียน คุณลักษณะนี้เหมาะอย่างยิ่งสำหรับคำแนะนำสั้นๆ หรือชื่อ
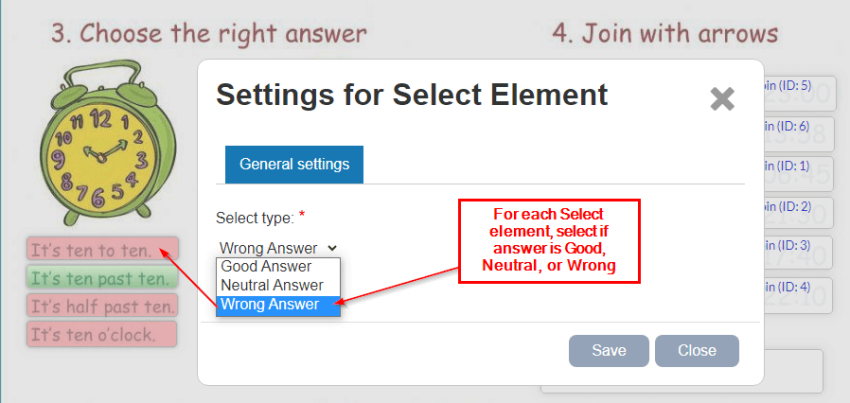
- เลือก< /แข็งแกร่ง>
ใช้องค์ประกอบนี้สำหรับคำถามใช่/ไม่ใช่ คลิกแก้ไขเพื่อระบุว่าส่วนประกอบให้คำตอบที่ถูกต้อง ลบ หรือเป็นกลาง
- พูด < /span> ให้นักเรียนตอบด้วยการพูด ป้อนข้อความที่แสดงคำตอบที่ถูกต้องและเลือกภาษาของผู้พูด อาจไม่ทำงานในเบราว์เซอร์อื่นที่ไม่ใช่ Google Chrome
- ช่องทำเครื่องหมาย< /แข็งแกร่ง>
ใช้องค์ประกอบนี้สำหรับคำถามใช่/ไม่ใช่ คลิกแก้ไขเพื่อระบุว่าส่วนประกอบให้คำตอบที่ถูกต้อง ลบ หรือเป็นกลาง

- ค่า เพิ่มคะแนนของนักเรียนสำหรับแบบฝึกหัดใดแบบฝึกหัดหนึ่งโดยการซ้อนทับองค์ประกอบค่าบนองค์ประกอบคำตอบ คลิกแก้ไขและเลือกค่าบูสต์เพื่อคูณคะแนน
- ค้นหาคำ (ปริศนา)< /span> สร้างตารางค้นหาคำพร้อมแผนที่คำตอบที่ถูกต้อง กำหนดจำนวนแถวและคอลัมน์ จากนั้นคลิกเซลล์ที่แสดงคำตอบที่ถูกต้อง
- โปรแกรมเล่น YouTube ฝังวิดีโอ YouTube โดยการคลิกแก้ไข และป้อน URL ของวิดีโอ ปรับขนาดกล่องเพื่อปรับขนาดเครื่องเล่น
- ฟิลด์ข้อความ< /แข็งแกร่ง> ใช้องค์ประกอบนี้สำหรับคำถามที่พิมพ์คำตอบ คลิกแก้ไขเพื่อป้อนค่าคำตอบที่ถูกต้อง นักเรียนจะได้รับคะแนนเมื่อคำตอบตรงกับค่าที่ถูกต้อง
เคล็ดลับที่เป็นประโยชน์บางประการ:
เลือกกล่องข้อความ หากต้องการเลือกกล่องข้อความ ให้วางเมาส์ไว้ตรงกลาง ของกล่อง จนกว่าคุณจะเห็นเคอร์เซอร์ย้าย จากนั้นคลิก กล่องจะต้องเป็นสีน้ำเงิน การย้ายกล่องข้อความ
ย้ายตำแหน่งกล่องข้อความโดยเลื่อนเคอร์เซอร์ไปไว้ตรงกลาง แล้วคลิกปุ่มเมาส์ค้างไว้ จากนั้นลากกล่องไปยังตำแหน่งที่ต้องการ
ปรับขนาดกล่องข้อความ หากต้องการปรับขนาดกล่องข้อความ ให้วางเมาส์ไว้ที่ขอบ จนกว่าคุณจะเห็นเคอร์เซอร์ปรับขนาด จากนั้นคลิกและลากเพื่อปรับขนาดกล่องข้อความ คุณยังสามารถคลิกที่ตรงกลางเพื่อเลือกช่อง จากนั้นกดปุ่ม Ctrl + ลูกศรบนแป้นพิมพ์เพื่อปรับขนาด
คัดลอกและวางกล่องข้อความ สิ่งนี้มีประโยชน์มากในการทำกล่องเดียวกันหลายๆ กล่อง ขนาด. เพียงคลิกที่ตรงกลางกล่องเพื่อเลือก จากนั้นกด Ctrl + C เพื่อคัดลอก และ Ctrl + V เพื่อวาง
ลบกล่องข้อความ หากต้องการลบกล่องข้อความ ให้คลิกตรงกลางเพื่อเลือก จากนั้นกด "ลบ" บนแป้นพิมพ์ของคุณ
เลิกทำและทำซ้ำ เพียงกด Ctrl + Z เพื่อเลิกทำการเปลี่ยนแปลงล่าสุด และ Ctrl + Y เพื่อทำการเปลี่ยนแปลงล่าสุดอีกครั้ง
แก้ไขรูปแบบกล่องข้อความ: แบบอักษร สี เส้นขอบ พื้นหลัง... คุณสามารถเปลี่ยนรูปแบบของกล่องข้อความของคุณได้ ขั้นแรกให้คลิกที่ "ดูตัวอย่าง" และกรอกคำตอบลงในช่องข้อความ จากนั้นคลิกขวาด้วยเมาส์บนกล่อง แล้วคุณจะเห็นหน้าต่างที่มีตัวเลือกทั้งหมด: แบบอักษร สี เส้นขอบ พื้นหลัง...
คำถามแบบเปิด
สำหรับคำถามปลายเปิดในแผ่นงานของคุณ ให้เพิ่มกล่องข้อความว่างที่มีขนาดเหมาะสมเพื่อให้นักเรียนกรอกคำตอบ โปรดทราบว่าคำถามประเภทนี้ไม่สามารถให้คะแนนอัตโนมัติได้
ยังไม่ชัดเจนหรือมีคำถาม เลือกแผ่นงานจากคอลเลกชันที่แบ่งปันของเราแล้วคลิก "มันทำอย่างไร?" คุณจะเห็นว่ามันง่ายมาก